
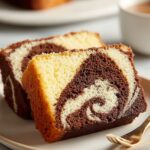
Three years ago, I needed a birthday cake for Emma but couldn't decide between chocolate and vanilla, so I made Marble Cake - the classic compromise that makes everyone happy. I divided my vanilla batter in half, mixed cocoa powder into one portion, then swirled them together in the pan with a knife before baking. When I sliced into that cooled cake, the pattern was beautiful - ribbons of chocolate weaving through vanilla, creating that signature marbled look. That first bite was perfect - tender and buttery with spots of rich chocolate flavor mixing with sweet vanilla, all in one slice. It tasted like the best of both worlds, nostalgic and comforting without being boring.

Why You'll Love This Marble Cake
It's the perfect compromise that actually makes everyone happy, not just settles for mediocre. Chocolate lovers get their fix with those rich cocoa swirls, vanilla lovers get that buttery, delicate cake, and everyone gets the fun of seeing a different pattern in every slice. Unlike those disappointing half-chocolate, half-vanilla cakes where you have to pick a side, marble cake gives you both flavors in every single bite. The chocolate isn't overpowering, and the vanilla isn't boring - they balance each other perfectly. When I serve this at birthday parties, I never hear "I wanted chocolate" or "I prefer vanilla" because everyone's getting what they want. It's genuinely delicious, not just a compromise.
It looks impressive but is actually easy to make, and stays moist for days. That marbled pattern looks like you spent hours carefully crafting it, but the reality is you just dollop two batters in a pan and swirl a few times with a knife. No special skills, no artistic talent required - the batter does the work for you. And unlike some fancy cakes that are dry by the next day, this stays incredibly moist thanks to the butter and proper mixing technique. I've served this three days after baking and it's still tender and delicious.
Jump to:
Ingredients for Marble Cake
Dry Ingredients:
- All-purpose flour
- Baking powder
- Salt
Wet Ingredients:
- Unsalted butter
- Granulated sugar
- Eggs
- Vanilla extract
- Whole milk
For the Chocolate Swirl:
- Unsweetened cocoa powder
- Hot water or milk
- Extra sugar
Optional Glaze/Frosting:
- Chocolate ganache
- Vanilla glaze
- Powdered sugar for dusting
- Chocolate buttercream
See recipe card for quantities.
How To Make Marble Cake Step By Step
Prep and Preheat:
- Preheat oven to 350°F
- Grease and flour your pan thoroughly
- Line loaf pan with parchment if using
- Set aside
Make the Vanilla Batter:
- Cream room temperature butter and sugar 3-4 minutes
- Beat until light and fluffy
- Add eggs one at a time, beating after each
- Mix in vanilla extract
- In separate bowl, whisk flour, baking powder, salt
- Alternate adding dry ingredients and milk to butter mixture
- Start and end with dry ingredients
- Mix until just combined, don't overmix

Divide and Make Chocolate Batter:
- Transfer half the vanilla batter to another bowl
- Mix cocoa powder with 2-3 tablespoons hot water
- Stir until smooth paste forms
- Fold cocoa mixture into half the batter
- Mix until evenly chocolate, no streaks
Create the Marble Pattern:
- Drop spoonfuls of vanilla batter into prepared pan
- Drop spoonfuls of chocolate batter between vanilla
- Alternate until all batter is used
- Tap pan on counter to release air bubbles
- Use butter knife or skewer
- Swirl through batter in figure-8 pattern
- Don't over-swirl or colors will muddy

Bake:
- Bake 50-60 minutes for loaf, 30-35 for round cake
- Top should spring back when touched
- Toothpick inserted comes out clean or with few crumbs
- Don't overbake
Cool and Serve:
- Slice to reveal marble pattern
- Cool in pan 10 minutes
- Turn out onto cooling rack
- Cool completely before slicing

Smart Substitutions That Work
Butter Options:
- Unsalted butter → Salted butter (reduce added salt)
- Butter → Vegetable oil (different texture, less flavor)
- Regular butter → European butter (richer)
Milk Choices:
- Whole milk → 2% or skim (slightly less rich)
- Regular milk → Buttermilk (tangier, more tender)
- Dairy milk → Almond or oat milk (dairy-free)
- Milk → Sour cream thinned with water (extra moist)
Sugar Swaps:
- Granulated sugar → Half granulated, half brown sugar
- White sugar → All brown sugar (darker, moister)
- Regular sugar → Coconut sugar (different flavor)
Flour Alternatives:
- All-purpose → Cake flour (more tender)
- Regular flour → Gluten-free 1:1 blend
- White flour → Half whole wheat (denser, nuttier)
Cocoa Powder:
- Dutch-process → Natural cocoa powder
- Unsweetened cocoa → Add extra sugar to chocolate portion
- Cocoa powder → Melted chocolate (adjust liquid)
Pan Substitutes:
- Loaf pan → Bundt pan (adjust time to 45-50 minutes)
- Single layer → Two 8-inch round pans (25-30 minutes)
- Large pan → Muffin tin (18-20 minutes)
- Traditional → Sheet pan for marble sheet cake
Flavor Additions:
- Classic → Chocolate chips folded into chocolate batter
- Plain vanilla → Almond extract in vanilla portion
- Standard → Espresso powder in chocolate (enhances chocolate)
- Basic → Orange zest in vanilla portion
Marble Cake Recipe Variations
Marble Pound Cake:
- Use pound cake batter base
- Denser, richer texture
- Better for slicing thin
- Lasts longer
Marble Bundt Cake:
- Bake in bundt pan 45-50 minutes
- Beautiful presentation
- Drizzle with chocolate ganache
- Special occasion style
Marble Cupcakes:
- Divide batter into cupcake liners
- Swirl in each cup individually
- Bake 18-20 minutes
- Perfect for parties
Three-Color Marble:
- Keep some batter plain vanilla
- Make chocolate portion
- Add strawberry or food coloring to third portion
- More colorful, fun for kids
Chocolate Chip Marble:
- Fold mini chocolate chips into vanilla batter
- Extra chocolate in every bite
- Emma's favorite version
Marble Loaf with Streusel:
- Top with cinnamon streusel before baking
- Coffee cake style
- Great for breakfast
- Crunchy topping
Red Velvet Marble:
- Use red velvet batter for colored portion
- Classic vanilla for other half
- Stunning visual
- Cream cheese frosting
Peanut Butter Swirl:
- Add peanut butter to chocolate portion
- Peanut butter cup flavor
- Rich and indulgent
Equipment For Marble Cake
- 9x5 inch loaf pan (or 9-inch round/bundt)
- Electric mixer (stand or hand)
- Two mixing bowls
- Measuring cups and spoons
- Rubber spatula
- Butter knife or wooden skewer (for swirling)
- Cooling rack

Storing Your Marble Cake
Room Temperature (3-4 days):
- Let cool completely first
- Wrap tightly in plastic wrap
- Store in airtight container
- Stays moist at room temp
- Best texture when not refrigerated
Refrigerator (1 week):
- Wrap well to prevent drying
- Store in sealed container
- Bring to room temp before serving (tastes better)
- Gets slightly denser when cold
Freezer Storage (3 months):
- Cool completely
- Wrap tightly in plastic wrap
- Wrap again in aluminum foil
- Place in freezer bag
- Label with date
- Thaw at room temp 2-3 hours
Frosted Cake Storage:
- Store under cake dome
- Or loosely covered with foil
- Buttercream freezes well
- Cream cheese frosting refrigerate
Sliced Portions:
- Wrap individual slices
- Great for lunchboxes
- Freeze individually
- Thaw as needed
Make-Ahead Strategy:
- Bake 1-2 days before serving
- Wrap and store at room temp
- Frost day of serving
- Flavor improves overnight
Keeping it Moist:
- Don't refrigerate unless frosted with perishable frosting
- Always wrap tightly
- Store cut side down on plate
- Add slice of bread in container (absorbs moisture without drying cake)
Top Tip
- Room temperature ingredients are absolutely non-negotiable for tender, fluffy cake. Cold butter won't cream properly with sugar - it just sits there in chunks instead of becoming light and fluffy. Cold eggs can cause the batter to curdle and separate, creating a dense, heavy cake. Take your butter, eggs, and milk out of the fridge at least one hour before you start baking. If you forget, you can bring eggs to room temp quickly by placing them in a bowl of warm water for 5 minutes.
- For butter, cut it into small pieces so it warms faster. This step makes the difference between a cake that's light and tender versus one that's dense and tough. I learned this the hard way when I tried rushing with cold ingredients and ended up with a brick instead of a cake.Don't over-swirl the batter or you'll end up with muddy gray cake instead of distinct marble.
- After you've alternated spoonfuls of vanilla and chocolate batter in your pan, use a butter knife and make just 3-4 figure-8 swirls through the batter. That's it. Stop. More swirling doesn't create better patterns - it just mixes the two batters together until they become one blended mess. The goal is distinct ribbons of chocolate weaving through vanilla, not a uniform gray color. Think of it like gently folding, not stirring.
FAQ
What is a marble cake made of?
Marble cake is made from a basic vanilla cake batter that's divided in half. One portion stays vanilla while cocoa powder is mixed into the other portion to make it chocolate. The two batters are then spooned alternately into a pan and swirled together with a knife to create the signature marbled pattern. The base ingredients are butter, sugar, eggs, flour, baking powder, milk, and vanilla, with cocoa powder added to half.
Why is it called marble cake?
It's called marble cake because the swirled pattern of chocolate and vanilla batters resembles the veined patterns found in marble stone. When you slice into the cake, each piece shows different swirls and ribbons of the two colors weaving together, just like the natural variations in marble. The name has been used since the 1800s when this cake style became popular.
Is marble cake healthy?
Marble cake is a traditional dessert made with butter, sugar, and flour, so it's a treat rather than a health food. However, it's not unhealthy in moderation as part of a balanced diet. A typical slice has around 300-350 calories. You can make it slightly healthier by reducing sugar, using whole wheat flour for half the flour, or substituting some butter with Greek yogurt. But honestly, it's dessert - enjoy it for what it is.
Does marble cake mix exist?
Yes, some brands make marble cake mix with both vanilla and chocolate batters included in one box. However, making marble cake from scratch is just as easy and tastes significantly better. Box mixes often have artificial flavors and produce a denser, less tender cake. Homemade marble cake takes about the same time and you control the quality of ingredients and the intensity of the marble pattern.
Time to Bake Your Perfect Marble Cake!
You've got everything you need for this Marble Cake - from blooming that cocoa powder properly to mastering the three-swirl technique that creates those beautiful ribbons. This classic cake proves that sometimes the best desserts are the timeless ones that never go out of style, satisfying everyone at the table with both chocolate and vanilla in every perfect slice. After making this countless times, I can promise you it'll become your go-to birthday cake that makes everyone happy.
Want more impressive desserts that deliver? Try our Easy Strawberry Shortcake Sushi Roll Recipe for a fun, creative treat that looks like sushi but tastes like cake! Craving something citrusy? Our Best Baby Lemon Impossible Pies Recipe makes individual magic pies with their own crust. Or bake our Easy Homemade Fig Bars Recipe for nostalgic treats that taste better than store-bought!
Made this marble cake? we love seeing your beautiful swirled creations!
Rate this Marble Cake and join our baking community!
Related
Looking for other recipes like this? Try these:


Pairing
These are my favorite dishes to serve with Marble Cake


Marble Cake
Equipment
- 1 9x5 inch loaf pan (or 9-inch round/bundt pan)
- 1 Electric mixer (stand or hand mixer)
- 2 Mixing bowls (for dividing batter)
- 1 Rubber spatula (for folding and scraping batter)
- 1 Measuring cup set —
- 1 Measuring spoon set —
- 1 Butter knife or skewer (for swirling the batters)
- 1 Cooling rack (to cool the cake completely)
Ingredients
- 2 ½ cups All-purpose flour - spooned and leveled
- 2 ½ teaspoon Baking powder —
- ½ teaspoon Salt - reduce if using salted butter
- 1 cup Unsalted butter - room temperature
- 1 ¼ cups Granulated sugar —
- 4 large Eggs - room temperature
- 2 teaspoon Vanilla extract — —
- ¾ cup Whole milk - room temperature
- 3 tablespoon Unsweetened cocoa powder - for chocolate batter
- 2–3 tablespoon Hot water or milk - to bloom cocoa
- 1 tablespoon Sugar - optional for chocolate batter
- — — Optional glaze/frosting - ganache vanilla glaze, or powdered sugar
Instructions
-
Preheat oven to 350°F (177°C). Grease and flour your loaf or bundt pan, and line with parchment paper if desired. Set aside.

- Cream butter and sugar until light and fluffy, about 3–4 minutes. Add eggs one at a time, then mix in vanilla. In a separate bowl, whisk flour, baking powder, and salt. Alternate adding dry ingredients and milk to the butter mixture until just combined.
-
Transfer half of the vanilla batter to another bowl. Mix cocoa powder with hot water (and sugar if using) into a smooth paste. Stir this cocoa mixture into half of the batter until evenly chocolate.
-
Spoon alternating dollops of vanilla and chocolate batter into the pan. Swirl gently with a knife in a figure-8 pattern. Bake for 50–60 minutes, or until a toothpick inserted in the center comes out clean.
-
Cool the cake in the pan for 10 minutes, then transfer to a wire rack. Cool completely before slicing to reveal the marbled pattern. Serve plain, glazed, or dusted with powdered sugar.


Leave a Reply