
The first time I made Japanese katsu curry was after a disastrous attempt at impressing Emma's Japanese teacher during a potluck dinner three years ago. I'd never tried it before, had no idea what "katsu" even meant, and somehow thought I could wing it without a recipe. What came out of my kitchen that night was a soggy, greasy mess with bland curry that tasted like dishwater. Emma took one bite, made a face, and said, "Mom, I think we should order pizza." His teacher was too polite to say anything, but I saw her pushing it around her plate.

Why You'll Love This Japanese Katsu Curry
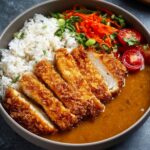
Backmaking this Japanese chicken katsu curry probably 50 times over the past three years, I can tell you exactly what makes it worth the effort. That crispy panko-crusted chicken cutlet golden brown and crunchy on the outside, juicy and tender inside sits on a bed of fluffy white rice that's drowning in thick, savory curry sauce. The curry itself is this beautiful deep brown color, almost mahogany, with chunks of soft potatoes, sweet carrots, and caramelized onions throughout. When you cut into that Japanese katsu curry sauce seeps into all those crispy ridges of breading, it's genuinely one of the most satisfying bites of food you'll ever experience.
What really sealed the deal for our family is how this homemade Japanese katsu curry manages to be both impressive and surprisingly doable on a weeknight. Yes, you're frying chicken, but it only takes about 4 minutes per cutlet. The curry sauce comes together in one pot using store-bought curry roux blocks (a total game-changer no measuring out 15 different spices), and while it simmers, you fry the katsu. Emma loves the ritual of it now he sets the table with our "special" plates, I slice the katsu into strips so it's easier to eat, and we drizzle extra curry on top.
Jump to:
- Why You'll Love This Japanese Katsu Curry
- Ingredients for Japanese Katsu Curry
- How To Make Japanese Katsu Curry Step By Step
- Smart Swaps for Japanese Katsu Curry
- Japanese Katsu Curry Variations
- Storing Your Japanese Katsu Curry
- Equipment For Japanese Katsu Curry
- The Dish My Mother Swore By (And Still Does!)
- Top Tip
- Why This Japanese Katsu Curry Recipe Works
- FAQ
- Japanese Comfort Food Made Simple!
- Related
- Pairing
- Japanese Katsu Curry
Ingredients for Japanese Katsu Curry
For the Curry Sauce:
- Japanese curry roux blocks
- Onions
- Carrots
- Potatoes
- Water or chicken stock
- Vegetable oil
- Soy sauce
- Worcestershire sauce

For the Chicken Katsu:
- Boneless chicken breasts or thighs
- All-purpose flour
- Large eggs
- Panko breadcrumbs
- Salt and pepper
- Vegetable oil for frying
To Serve:
- Fukujinzuke pickles
- Japanese short-grain rice
- Shredded cabbage
See recipe card for quantities.

How To Make Japanese Katsu Curry Step By Step
Make the Curry Base
- Heat oil in large pot over medium heat
- Add sliced onions and cook 5-7 minutes until soft and golden
- Add carrots and potatoes, stir to coat with oil
- Pour in water or stock to cover vegetables by 1 inch
- Bring to boil, then reduce to simmer for 15-20 minutes until vegetables are tender

Finish the Curry Sauce
- Turn off heat completely and let sit 2 minutes
- Break curry roux blocks into pot and stir until dissolved
- Return to low heat and simmer 5 minutes, stirring often
- Add soy sauce and Worcestershire if using
- Keep warm on lowest setting while you fry katsu

Prepare the Chicken
- Pound chicken cutlets to even ½-inch thickness with meat mallet
- Season both sides generously with salt and pepper
- Set up breading station: flour in first bowl, beaten eggs in second, panko in third
- Pat chicken dry with paper towels before breading

Bread and Fry the Katsu
- Dredge chicken in flour, shake off excess
- Dip in egg, letting extra drip off
- Press firmly into panko on both sides to coat completely
- Heat ½ inch oil in skillet to 350°F
- Fry 3-4 minutes per side until deep golden brown
- Drain on wire rack, not paper towels

Assemble and Serve
- Serve with shredded cabbage and pickles on side
- Place steamed rice in bowl or plate
- Slice katsu into 1-inch strips
- Arrange katsu next to or on top of rice
- Ladle generous amount of curry sauce over everything

Smart Swaps for Japanese Katsu Curry
Protein Options:
- Chicken breast → Chicken thighs (juicier, more forgiving)
- Chicken → Pork loin cutlets (traditional tonkatsu curry)
- Meat → Firm tofu slices (press well, bread same way)
- Regular → Shrimp (butterfly them first)
Breading Alternatives:
- Panko → Regular breadcrumbs (less crispy, but works)
- Traditional → Gluten-free panko (tastes identical)
- Standard → Crushed cornflakes (surprisingly good crunch)
Curry Sauce Swaps:
- Curry roux blocks → Curry paste plus flour (not quite the same)
- Golden Curry → Vermont Curry (sweeter, milder)
- Store-bought → Homemade roux (time-consuming but doable)
Cooking Method:
- Deep frying → Shallow pan frying (what I do at home)
- Frying → Baking at 400°F with oil spray (healthier, less crispy)
- Oil → Air fryer at 375°F for 12 minutes (Emma's favorite method)
Vegetable Changes:
- Fresh → Frozen mixed vegetables (shortcut for busy nights)
- Potatoes → Sweet potatoes (adds sweetness)
- Standard mix → Add mushrooms, bell peppers (non-traditional but tasty)
Japanese Katsu Curry Variations
Cheese Katsu Curry:
- Stuff mozzarella inside chicken before breading
- Cheese melts and oozes when you cut it
- Emma calls this "the lava chicken"
- Restaurant-level impressive
Spicy Tonkatsu Curry:
- Use pork loin instead of chicken
- Add chili oil to curry sauce
- Sprinkle with red pepper flakes
- For adults only in our house
Curry Udon Bowl:
- Serve curry over thick udon noodles
- Skip the rice entirely
- Add sliced katsu on top
- Popular Japanese comfort food
Katsu Curry Don:
- Slice katsu before coating in curry
- Serve everything over rice in a bowl
- Add soft-boiled egg on top
- Easier to eat with chopsticks
Sweet Potato Curry:
- Replace regular potatoes with sweet potatoes
- Add apple chunks to curry (authentic twist)
- Slightly sweeter sauce
- My personal favorite variation
Storing Your Japanese Katsu Curry
Curry Sauce Storage (4-5 days):
- Cool completely before storing
- Keep in airtight container in fridge
- Reheat gently on stovetop with splash of water
- Actually tastes better next day as flavors develop
Katsu Storage (2-3 days):
- Store separately from curry and rice
- Place on paper towel in container
- Don't stack cutlets (they'll steam each other)
- Reheat in 350°F oven for 8-10 minutes to crisp up
Rice Storage (3-4 days):
- Cool to room temperature first
- Store in sealed container
- Microwave with damp paper towel on top
- Add tablespoon of water before reheating
Freezing Tips:
- Better to freeze breaded uncooked cutlets
- Curry sauce freezes beautifully for 3 months
- Portion into single servings
- Fried katsu freezes okay but loses crispness
Equipment For Japanese Katsu Curry
- Large heavy-bottomed pot or Dutch oven
- Deep skillet or frying pan (10-12 inch)
- Wire cooling rack with baking sheet
- Three shallow bowls for breading
- Meat mallet or rolling pin
- Kitchen thermometer (for oil temp)
- Sharp knife for slicing

The Dish My Mother Swore By (And Still Does!)
My mom has been making Japanese katsu curry for over thirty years, ever since she lived in Japan for two years back in the '90s. She came back obsessed with Japanese comfort food and determined to recreate the curry she ate at a tiny restaurant near her apartment. For years, she guarded her method like a state secret, and even though I'd eaten her version hundreds of times growing up, I could never get mine to taste quite the same. Last Christmas, she finally showed me what she'd been doing differently all these years.
Those 30 seconds absorb the excess surface oil without letting the steam build up underneath, which is what makes it soggy.Her other trick? She never serves the curry poured over the katsu like restaurants do. Instead, she places the sliced katsu on top of the rice, then ladles the curry sauce around it, not on it. This way, the breading stays crispy right up until the moment you take your first bite and deliberately drag it through the curry yourself. Emma tried it both ways side by side, and even he could tell the difference. She just smiled and said, "Thirty years of making this, and people still think restaurants do it better.
Top Tip
- My Japanese neighbor taught me something about making Japanese katsu curry that completely transformed how mine turned out. For months, my curry was either too thin and watery or had weird lumps of undissolved roux floating around. I'd watched YouTube videos, followed recipes exactly, but something was always off. One afternoon, she came over while I was cooking and immediately spotted my mistake.
- "You're adding the blocks while it's boiling," she said, shaking her head with a smile. She showed me her method: turn off the heat completely, wait two full minutes for the bubbling to stop, break the curry roux blocks into smaller pieces, then stir them in gently until fully dissolved. Only then do you turn the heat back on to low. Those two minutes of patience make all the difference the roux melts smoothly into the liquid instead of forming clumps or breaking down unevenly from the intense heat.
- But her real secret was something I never would've figured out on my own. She always grates a tiny bit of apple into the curry right before adding the roux blocks. Just a quarter of an apple, grated on the finest holes of a box grater until it practically disappears into the sauce. It adds this subtle sweetness and depth that makes people ask "what's different about your curry?" The apple completely dissolves during cooking, so you can't taste it directly,.
Why This Japanese Katsu Curry Recipe Works
Back making this dish over 50 times and studying what makes restaurant versions so good, I've figured out the key techniques that guarantee success every time. The magic starts with proper breading pressing the panko firmly into the chicken creates those deep ridges that stay extra crispy and catch all that curry sauce. When you pound the chicken to an even thickness, it cooks uniformly, so you don't end up with dried-out edges and raw centers like I did in my early attempts.
The curry sauce works because those Japanese curry roux blocks contain perfectly balanced spices plus wheat flour for thickening you're basically getting a foolproof curry base that's been perfected over decades by Japanese food companies. Sautéing the onions until they're golden and sweet builds a flavor foundation that cheap shortcuts can't match. Letting the vegetables simmer until tender means they break down slightly and thicken the sauce naturally while releasing their sweetness into the curry.
FAQ
What is a Japanese katsu curry?
Japanese katsu curry is a beloved comfort food dish featuring a crispy breaded and fried cutlet (usually chicken or pork) served over rice and topped with thick, savory Japanese curry sauce. It's part of yoshoku cuisine Western-influenced Japanese food that's become a staple in Japan.
What makes katsu curry different?
Unlike Indian or Thai curry, Japanese curry is thicker, sweeter, and milder with a gravy-like consistency. The curry roux contains a blend of spices plus flour for thickening, creating that signature texture. Combined with crispy panko-breaded katsu, it's uniquely Japanese comfort food.
Is Japanese katsu curry healthy?
Japanese katsu curry is indulgent comfort food the fried cutlet and curry sauce with rice make it calorie-dense. However, you can make it healthier by baking the katsu, using chicken breast, adding more vegetables to the curry, or serving smaller portions with extra cabbage on the side.
What does Japanese katsu curry taste like?
It tastes savory and slightly sweet with warming spices that aren't spicy-hot. The curry has umami depth from the roux, while the vegetables add sweetness. The crispy katsu provides textural contrast. Overall, it's comforting, rich, and deeply satisfying like a hug in food form.
Japanese Comfort Food Made Simple!
Now you've got all the secrets to making perfect Japanese katsu curry—from frying the crispiest panko-crusted chicken to getting that curry sauce just right with properly dissolved roux blocks. This dish proves that restaurant-quality Japanese food is totally doable at home, and honestly, once you nail the technique, it's easier than you think.
Craving more impressive dinners that look fancy but aren't complicated? Try our Delicious Florida Shrimp Pie Recipe for an elegant seafood main that wows every time. If you're hooked on Japanese flavors, our Best Honey Mustard Chicken Recipe brings all those sushi bar vibes in a casserole format. And for a fun twist on comfort food, our The Best American Goulash Recipe are always a crowd-pleaser!
Share your katsu curry success! We love seeing your Friday night dinners!
Rate this Japanese Katsu Curry and join our cooking community!
Related
Looking for other recipes like this? Try these:


Pairing
These are my favorite dishes to serve with Japanese Katsu Curry


Japanese Katsu Curry
Equipment
- 1 Large heavy-bottomed pot or Dutch oven (For simmering curry sauce)
- 1 Deep skillet or frying pan (10–12 inch) (For frying chicken)
- 1 Wire rack + baking sheet (To drain katsu without getting soggy)
- 3 Shallow bowls (For flour, egg, and panko)
- 1 Meat mallet or rolling pin (To flatten chicken evenly)
- 1 Kitchen thermometer (For checking oil temperature)
- 1 Sharp knife (For slicing katsu)
Ingredients
For the Curry Sauce
- 2 tablespoon Vegetable oil - For sautéing
- 2 medium Onions - Thinly sliced
- 2 medium Carrots - Cut into bite-sized chunks
- 2 medium Potatoes - Peeled and cut into chunks
- 3 cups Water or chicken stock - Enough to cover vegetables by 1 inch
- 4 blocks Japanese curry roux - e.g. Golden Curry or Vermont Curry
- 1 tablespoon Soy sauce - Optional for depth
- 1 teaspoon Worcestershire sauce - Optional for richness
- ¼ Apple Finely grated - optional but adds sweetness
For the Chicken Katsu
- 2 large Boneless chicken breasts - Or 4 thighs pounded to ½-inch thick
- to taste Salt and pepper - Season both sides
- ½ cup All-purpose flour - For dredging
- 2 large Eggs - Beaten
- 1 ½ cups Panko breadcrumbs - Japanese-style breadcrumbs
- as needed Vegetable oil - For frying about ½ inch deep
To Serve
- 4 servings Japanese short-grain rice - Steamed
- 1 cup Shredded cabbage - Optional for freshness
- 2 tablespoon Fukujinzuke pickles - Optional traditional garnish
Instructions
-
Heat oil in a large pot over medium heat. Add onions, carrots, and potatoes; sauté until lightly golden. Add water or stock to cover vegetables and simmer 15–20 minutes until tender.

-
Turn off heat for 2 minutes, then stir in broken curry roux blocks until fully dissolved. Return to low heat, add soy sauce, Worcestershire sauce, and grated apple if using. Simmer 5 minutes.
-
Pound chicken to even thickness, season with salt and pepper, then dredge in flour, dip in beaten egg, and coat with panko breadcrumbs.
-
Heat oil in a skillet to 350°F (175°C). Fry chicken 3–4 minutes per side until golden brown and crisp. Transfer to a wire rack to drain.
-
Place rice on a plate, slice katsu, and arrange beside the rice. Ladle curry sauce over or around the chicken and garnish with cabbage and pickles.


Leave a Reply