
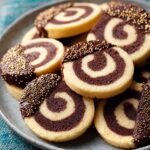
These swirly pinwheel cookies stack chocolate and vanilla dough into one of the prettiest treats you can bake at home. They're soft, chewy, and way easier than they look, especially with the simple template method that keeps every cookie uniform. I first tried making these for a holiday cookie swap, and honestly, the reactions made me feel like a professional baker even though I'm definitely not.

If you love festive cookie ideas like my Best Chocolate Zucchini Bread Recipe or The Best Date Brownies Recipe, you'll want to add these beauties to your rotation. They're perfect for gifting, parties, or just making your kitchen smell like a bakery.
The template trick changes everything. Instead of guessing or ending up with wonky spirals, you'll get clean, even swirls every single time.
Why You'll Love These Pinwheel Cookies
They look impressive but don't require any fancy skills. The template system takes out all the guesswork, so even if you've never made rolled cookies before, you'll get professional-looking results. The dough is super forgiving, and the flavor is classic not too sweet, perfectly balanced between vanilla and chocolate.
These Pinwheel Cookies also hold up really well. You can make the dough days ahead, keep the logs in the fridge, and slice and bake whenever you need fresh cookies. They stay soft for about a week if you store them properly, which makes them ideal for holiday baking when you're juggling twenty other things.
Jump to:
Ingredients For Pinwheel Cookies
Here's what makes these swirled Pinwheel Cookies so perfectly soft and chewy.
See Recipe Card Below This Post For Ingredient Quantities
Vanilla Dough:
Unsalted butter : Creamed butter creates the rich, tender texture that keeps these cookies soft. Make sure it's truly at room temperature so it blends smoothly with the sugar.
Granulated sugar : Sweetens the dough and helps create that slightly crispy edge while keeping the center chewy.
Vanilla bean paste or extract : Adds warm vanilla flavor that shines through in the vanilla swirls. Bean paste gives you those pretty specks, but extract works perfectly too.
Large egg : Binds everything together and adds moisture. Room temperature eggs blend better into the dough.
All-purpose flour : Forms the structure of the cookies and keeps them from spreading too much during baking.
Kosher salt : Balances the sweetness and makes the vanilla flavor pop. Use less if you're using regular table salt, or skip it entirely if your butter is salted.
Baking powder : Gives the Pinwheel Cookies just a tiny lift without making them puffy or cake-like.
Chocolate Dough:
Dutch process or regular cocoa : Gets mixed into part of the vanilla dough to create the chocolate swirls. Sifting prevents lumps and gives you smooth, even chocolate color.
How T o Make Pinwheel Cookies
Rolling and layering the dough is easier than it sounds, especially with the template guide.
Cream butter and sugar: In a stand mixer, combine the softened butter, granulated sugar, and vanilla. Beat on medium-high speed until the mixture looks light and fluffy, usually 2 to 3 minutes. Scrape down the bowl once or twice to make sure everything blends evenly.
Add egg: Mix in the egg until it's fully incorporated and the dough looks smooth.
Make dough: Add the flour, salt, and baking powder. Mix on low speed until a soft dough forms. Don't overmix stop as soon as you don't see any dry flour.
Divide dough: Remove 360g of dough and set it aside for the vanilla portion. Add the sifted cocoa to the remaining dough in the bowl and mix until the chocolate is fully combined and you don't see any streaks.

Roll dough: Place one portion of dough on a sheet of parchment paper, then top it with another sheet. Roll the dough to 4mm thickness, using an A4 paper template as your size guide. Repeat with the second dough portion.

Freeze: Transfer both sheets of rolled dough (still on parchment) to the freezer for 20 minutes until they're fully solid. This makes trimming and layering so much easier.
Trim to template: Remove the top parchment sheet from each dough, then cut both portions to match the size of your template. Pop them back in the freezer for 5 more minutes.
Layer dough: Place the chocolate dough on top of the vanilla dough with about a 1cm overlap along the long edge. Press gently with your hands to remove any air bubbles between the layers.
Roll pinwheel: Starting at the long edge, roll the layered dough tightly into a log, like you're making a jelly roll. If you see any cracks, just patch them with your fingers. Roll the log back and forth gently on the counter to seal the seam.

Chill logs: Wrap the dough log tightly in plastic wrap. Refrigerate for at least 2 hours or up to 5 days. If you have a PVC pipe or paper towel roll, slide the wrapped dough inside—it helps keep the edges perfectly round while chilling.
Preheat oven: Set your oven to 330°F (165°C). Line one or two baking sheets with parchment paper.
Slice cookies: Unwrap the chilled dough, trim off the uneven ends, and slice the log into 1cm thick cookies. Arrange them on your prepared baking sheets with a bit of space between each one.
Freeze before baking: Pop the sliced cookies into the freezer for 10 minutes. This helps them hold their shape and keeps the swirls crisp.
Bake: Bake for 15 to 16 minutes until the edges look set and lightly golden. The centers might still look a tiny bit soft, and that's exactly what you want.
Cool: Let the cookies cool on the baking sheet for 10 minutes, then transfer them to a wire rack to cool completely. Store in an airtight container at room temperature for up to a week.
Equipment For Pinwheel Cookies
You don't need anything fancy, but a few tools make this process smoother. A stand mixer with a paddle attachment works best for creaming the butter and sugar, though a handheld electric mixer will do the job too. You'll want parchment paper for rolling and baking, a rolling pin, and an A4 paper template to guide your dough size.
A sharp knife is essential for clean slices, and plastic wrap keeps your dough logs sealed while chilling. A wire rack helps the cookies cool evenly, and a ruler makes sure your slices are uniform. If you have a PVC pipe or paper towel roll, it's a handy trick for keeping the log perfectly round while it chills in the fridge.
Substitutions and Variations
If you don't have vanilla bean paste, regular vanilla extract works just as well. You'll lose the pretty specks, but the flavor stays the same. For the cocoa, Dutch process gives you a deeper, smoother chocolate taste, but regular cocoa works fine too—the color might be slightly lighter.
You can swap the chocolate and vanilla combo for other flavors. Try adding a few drops of peppermint extract to the vanilla dough for a minty twist, or mix in some finely ground freeze-dried strawberries for pink swirls. Some people like to add a thin layer of jam between the doughs before rolling, which gives you a fruity surprise in every bite.
If you want to make these dairy-free, use plant-based butter and make sure it's at room temperature. The texture might be slightly different, but the cookies will still turn out soft and chewy.
Storage Your Pinwheel Cookies
These Pinwheel Cookies stay fresh in an airtight container at room temperature for up to a week. If you want to keep them longer, freeze the baked cookies in a single layer on a baking sheet, then transfer them to a freezer bag. They'll keep for about three months and taste just as good when you thaw them.
You can also freeze the unbaked dough logs. Wrap them tightly in plastic wrap and then in foil, and they'll stay good in the freezer for up to three months. When you're ready to bake, let the log sit at room temperature for about 10 minutes to soften slightly, then slice and bake as usual.
Expert Tips
The freezing steps aren't optional they're what make the difference between clean swirls and a messy blob. When the dough is solid, it's easy to handle and layer without stretching or tearing. Don't skip the 10-minute freeze before baking either, because it keeps the shapes crisp while the Pinwheel Cookies bake.
Use a sharp knife and wipe it clean between slices. This keeps your swirls looking sharp and prevents chocolate from smearing into the vanilla sections. If the dough gets too soft while you're slicing, pop it back in the freezer for a few minutes.
The PVC pipe trick is a game changer if you want perfectly round cookies. Without it, the dough log can get a flat side from sitting in the fridge, which gives you oval cookies instead of circles. A paper towel roll works just as well and costs nothing.
Serving Suggestions
These pinwheel cookies are perfect on their own, but they're even better with a glass of cold milk or a cup of hot cocoa. I like to arrange them on a platter with other holiday swirl cookies or dessert recipes for a cookie exchange spread.
They also make gorgeous gifts. Stack them in a clear cellophane bag tied with ribbon, or layer them in a decorative tin with parchment paper between each layer. The swirls look so pretty that people always assume you spent way more time on them than you actually did.
For parties, serve them alongside vanilla chocolate treats like The Best German Chocolate Sheet Cake or simple chewy chocolate Pinwheel Cookies. The soft baked cookies texture pairs well with just about anything, and they photograph beautifully if you're posting them online.
FAQ
What are Pinwheel Cookies?
Pinwheel cookies are rolled cookies made by layering two different colored or flavored doughs, rolling them into a log, chilling, and slicing. When you cut through the log, you see pretty spiral patterns. They're usually chocolate and vanilla, but you can use any flavor combo you like. My kids love helping with these because slicing into the log and seeing the swirls feels like opening a present.
How long does it take for pinwheels to get soggy?
If you store them in an airtight container, these Pinwheel Cookies stay crisp on the edges and soft in the center for about a week. They don't really get soggy unless you leave them out uncovered or store them somewhere humid. I keep mine in a plastic container with a tight lid, and they taste just as good on day seven as they do fresh from the oven.
What is the purpose of pinwheels?
The Pinwheel Cookies shape is mostly decorative it makes the cookies look fancy and special, which is why they're so popular for holidays and gift-giving. The swirls also let you combine two flavors in one Pinwheel Cookies, so you get chocolate and vanilla in every bite. Plus, they're fun to make with kids because rolling and slicing the dough feels like a little baking project.
What is a good filling for pinwheels?
You don't need a filling for classic pinwheel cookies since the dough layers create the swirls, but some people like to spread a thin layer of jam, Nutella, or cookie butter between the doughs before rolling. Just keep it thin so the log doesn't get too thick or messy. I've tried raspberry jam, and it adds a nice fruity tang that goes really well with the chocolate.
Related
Looking for other recipes like this? Try these:


Pairing
These are my favorite dishes to serve with Pinwheel Cookies


Pinwheel Cookies
Ingredients
- 170 g unsalted butter softened to room temperature
- 180 g granulated sugar for sweetness and structure
- 1 teaspoon vanilla extract or vanilla bean paste for stronger flavor
- 1 large egg about 50 g, room temperature
- 310 g all-purpose flour for structure
- ½ teaspoon kosher salt omit if using salted butter
- ¼ teaspoon baking powder for slight lift
- 15 g cocoa powder sifted, for chocolate dough
Instructions
- Cream the butter, sugar, and vanilla together in a stand mixer until light and fluffy, scraping down the sides once or twice.
- Add the egg and blend until fully incorporated.
- Stir in the flour, salt, and baking powder until a uniform dough forms.
- Remove about 360 g of dough and place in a small bowl for vanilla; leave the rest for chocolate dough.
-
Mix the cocoa powder into the remaining dough until fully combined.

- Place one dough portion between two sheets of parchment paper and roll to 4 mm thickness using a template or guide.
- Repeat the rolling process for the second dough portion.
- Transfer both rolled dough sheets, still between parchment, to the freezer for 20 minutes until firm.
- Remove the top parchment from each sheet and trim the dough to match your template size.
-
Freeze the trimmed dough sheets again for 5 minutes to firm.
- Place the chocolate dough on top of the vanilla sheet with a 1 cm overlap and gently press to remove air bubbles.
- Allow the layered dough to rest for 5–10 minutes until pliable, then carefully roll from the long edge to form a tight log.
-
Wrap the dough log in plastic wrap and chill in the refrigerator for at least 2 hours (or up to 5 days).
- Preheat the oven to 165°C (330°F) and line baking sheets with parchment paper.
- Slice the chilled log into 1 cm thick cookies using a sharp knife and place them on the prepared sheets.
- Freeze the sliced cookies for 10 minutes to help them hold their shape.
- Bake the cookies for 15–16 minutes until edges are set and lightly golden.
- Cool the cookies on the baking sheet for 10 minutes, then transfer to a wire rack to cool completely.
- Store the cooled cookies in an airtight container at room temperature for up to 1 week.


Leave a Reply